How to use this checklist
- Click the › button or press PgDn to move to the next step.
- Click the ‹ button or press PgUp to go back one step.
- Click a section title to open it, or a task to see its screenshot.
1. Check Before You Start
-
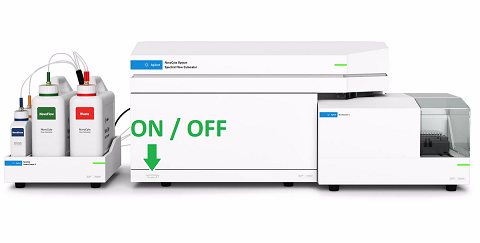
Press the ON/OFF button on the front panel if Opteon is not already on.
-
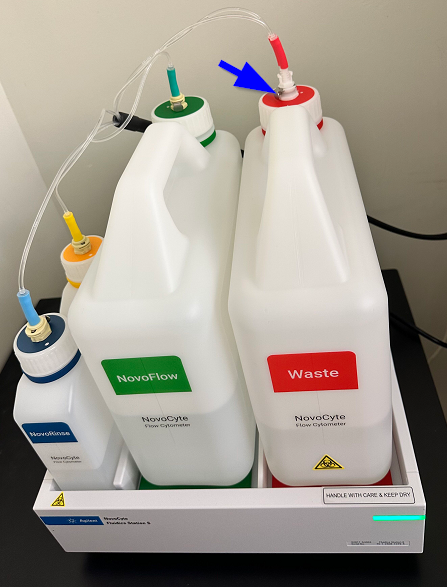
- Empty the waste tank if almost full:
- Disconnect tubing, empty in the sink, add ~300mL bleach.
- Reconnect waste tank to instrument.
- Refill sheath tank with DI water if nearly empty.
- Disconnect tubing, fill with DI water.
- Reconnect sheath tank to instrument.
Note: To disconnect the tubing, press the metal tab (blue arrow) and pull gently on the tubing.
- Empty the waste tank if almost full:
-
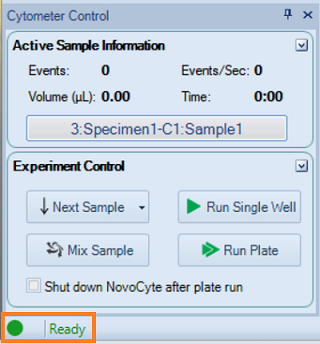
Make sure Ready is displayed on the status bar.
2. Create Experiment
-
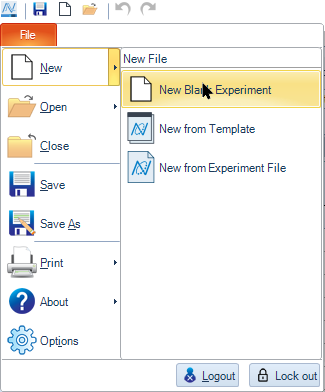
Click File → New → New Blank Experiment.
-
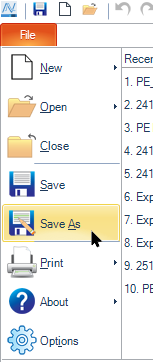
Click File → Save As and save your file.
- We recommend saving the experiment at this time, but it is fine to save it later.
- The .ncf file should be saved in the folder assigned to your lab.
-
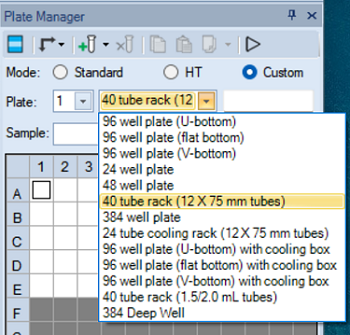
In Plate Manager, select a plate type or the tube rack.
3. Set Up Reference Controls
-
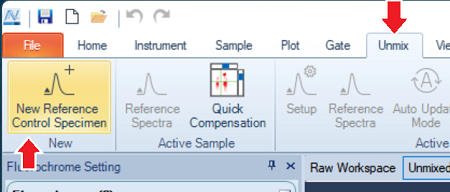
In the Menu, click Unmix → New Reference Control Specimen.
-
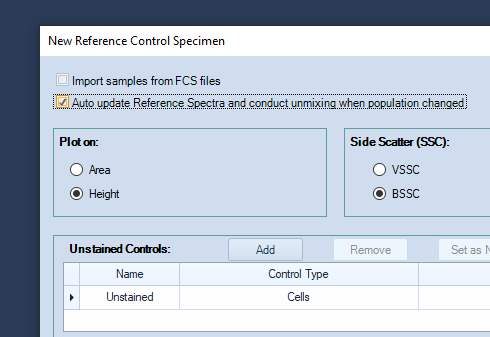
In the new window that pops up, check Auto Update Reference Spectra, to have the unmixing recalculated whenever a gate on a reference control is modified.
-
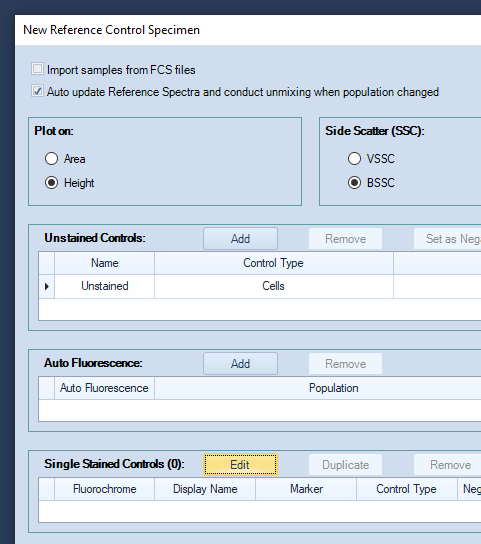
Click the Edit button, next to Single Stained Controls to open the "Edit Fluorochrome" window.
-
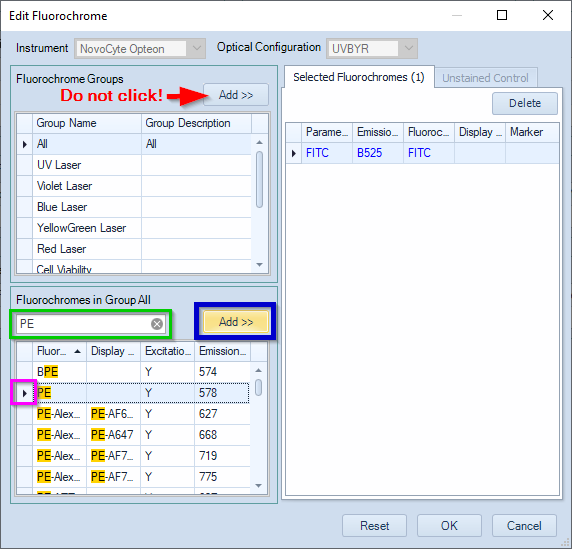
- In the Edit Fluorochrome window, type the name of a fluorochrome in the box framed in green.
- Double-click the fluorochrome to add it.
Alternatively, select the fluorochrome and click Add (framed in blue). - Repeat for all fluorochromes used in your panel.
-
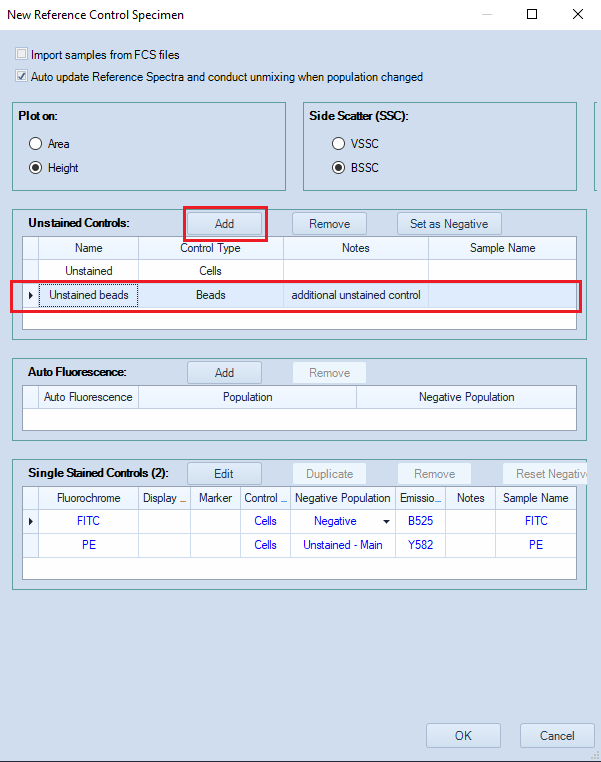
- Additional unstained controls are typically necessary when there are no negative events in some single color controls.
- Click the Add button (framed in red) to add an additional unstained control.
- In the image below, an "Unstained beads" control made with beads has been added.
-
If necessary, change the Control type and the Negative population.
As an example, in the image below, different negative populations are selected for each single-color control.- The FITC single color control contains positive and negative events. The existing Negative population will be used for unmixing.
- For PE, the Unstained control (Type: Cells) will provide the negative population.
- For PE-Cy7, the negative population used for unmixing will be defined using the Unstained beads.
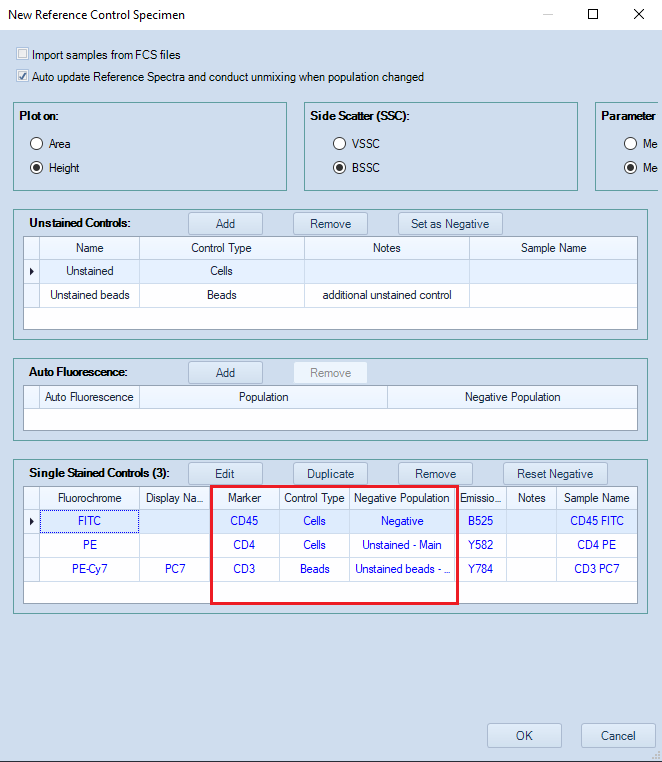
-
- Obviously, the position of the controls in Experiment Manager must match the position of actual controls in the plate or tube rack.
- When using the tube rack, it is often easier to physically relocate the tubes in the rack.
- When controls are in a multi-well plate, go to Experiment manager or to Worklist and reposition the controls in the software.
- Example: The position of a sample is being edited in Experiment Manager.
- To relocate the Unstained control in well A1, go to Experiment Manager, click A1 once, then click it again.
- A1 is now highlighted in blue and can be edited (see screenshot 1).
- After typing "A3" (in place of "A1"), the Unstained sample is repositioned in A3 (see screenshot 2).
The Plate Manager also shows the repositioning of the Unstained control.
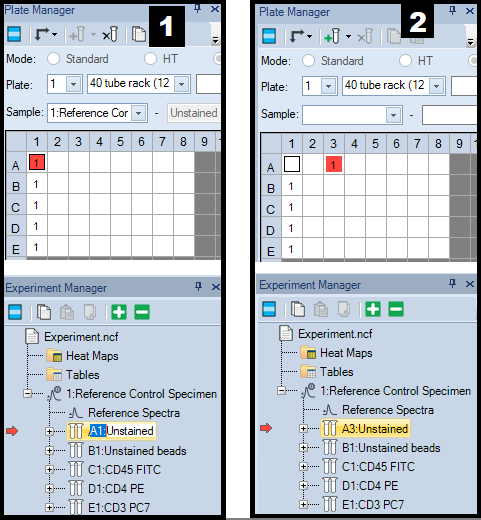
-
- The A1 position is marked on the stage (top image).
- The tube rack (without any controls) sitting on the stage (bottom image).
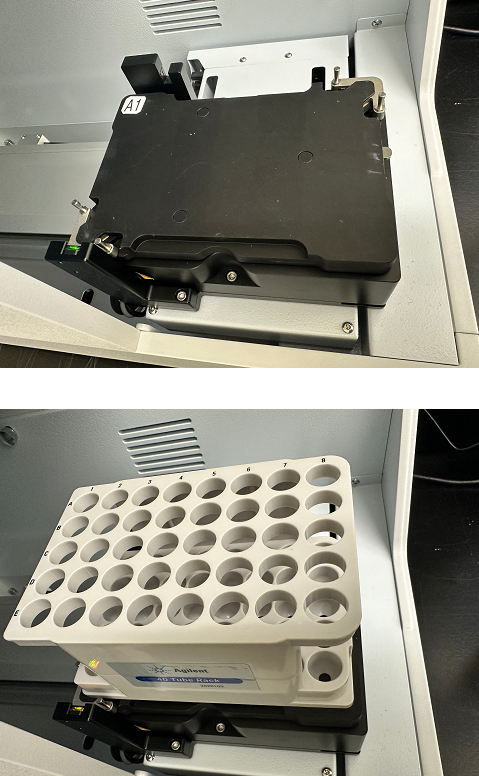
4. Run reference controls
-
- In Experiment Manager, double-click the first control to run.
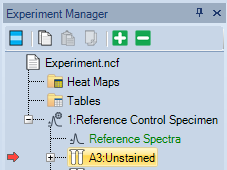
-
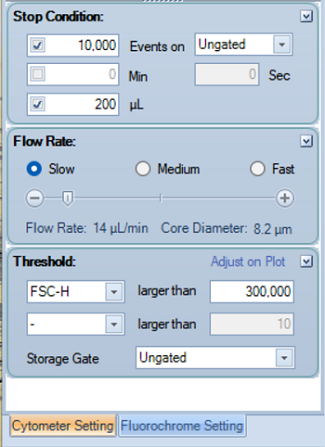
- In the Cytometer Setting, set the Flow Rate to Slow.
- Adjust Stop condition.
- Note:After starting to run the first control, you may need to return here and adjust the Threshold.
-
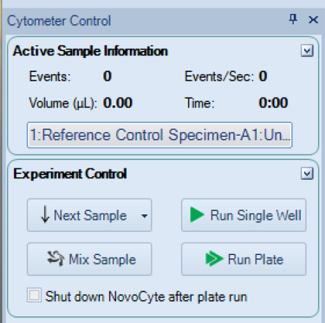
- In Cytometer Control, click Run Single Well.
- If necessary, go to Cytometer Setting and adjust the Threshold.
-
- Usually, the reference controls need to be run with the same settings.
- If the settings for the first control were changed, they may need to be be applied to the remaining controls.
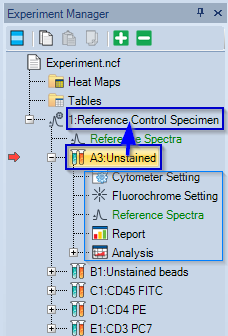
- In Experiment Manager, drag-and-drop the
first control onto the Reference Control Specimen.
All the settings of the first control are applied to all samples in the Reference Control Specimen: - Cytometer setting (detector gains, flow rate, threshold)
- Fluorochrome Setting (fluorochromes, markers)
- Reference Spectra (unmixing information)
- Report (automatically generated)
- Analysys (plots, gates, gating hierarchy)
- It is also possible to drag-and-drop a sample onto another sample (not necessarily onto a specimen).
-
- In Cytometer Control, click Run plate.
- A window (not shown here) will pop up .
Select the wells that contain reference controls and click Run to record them.
-
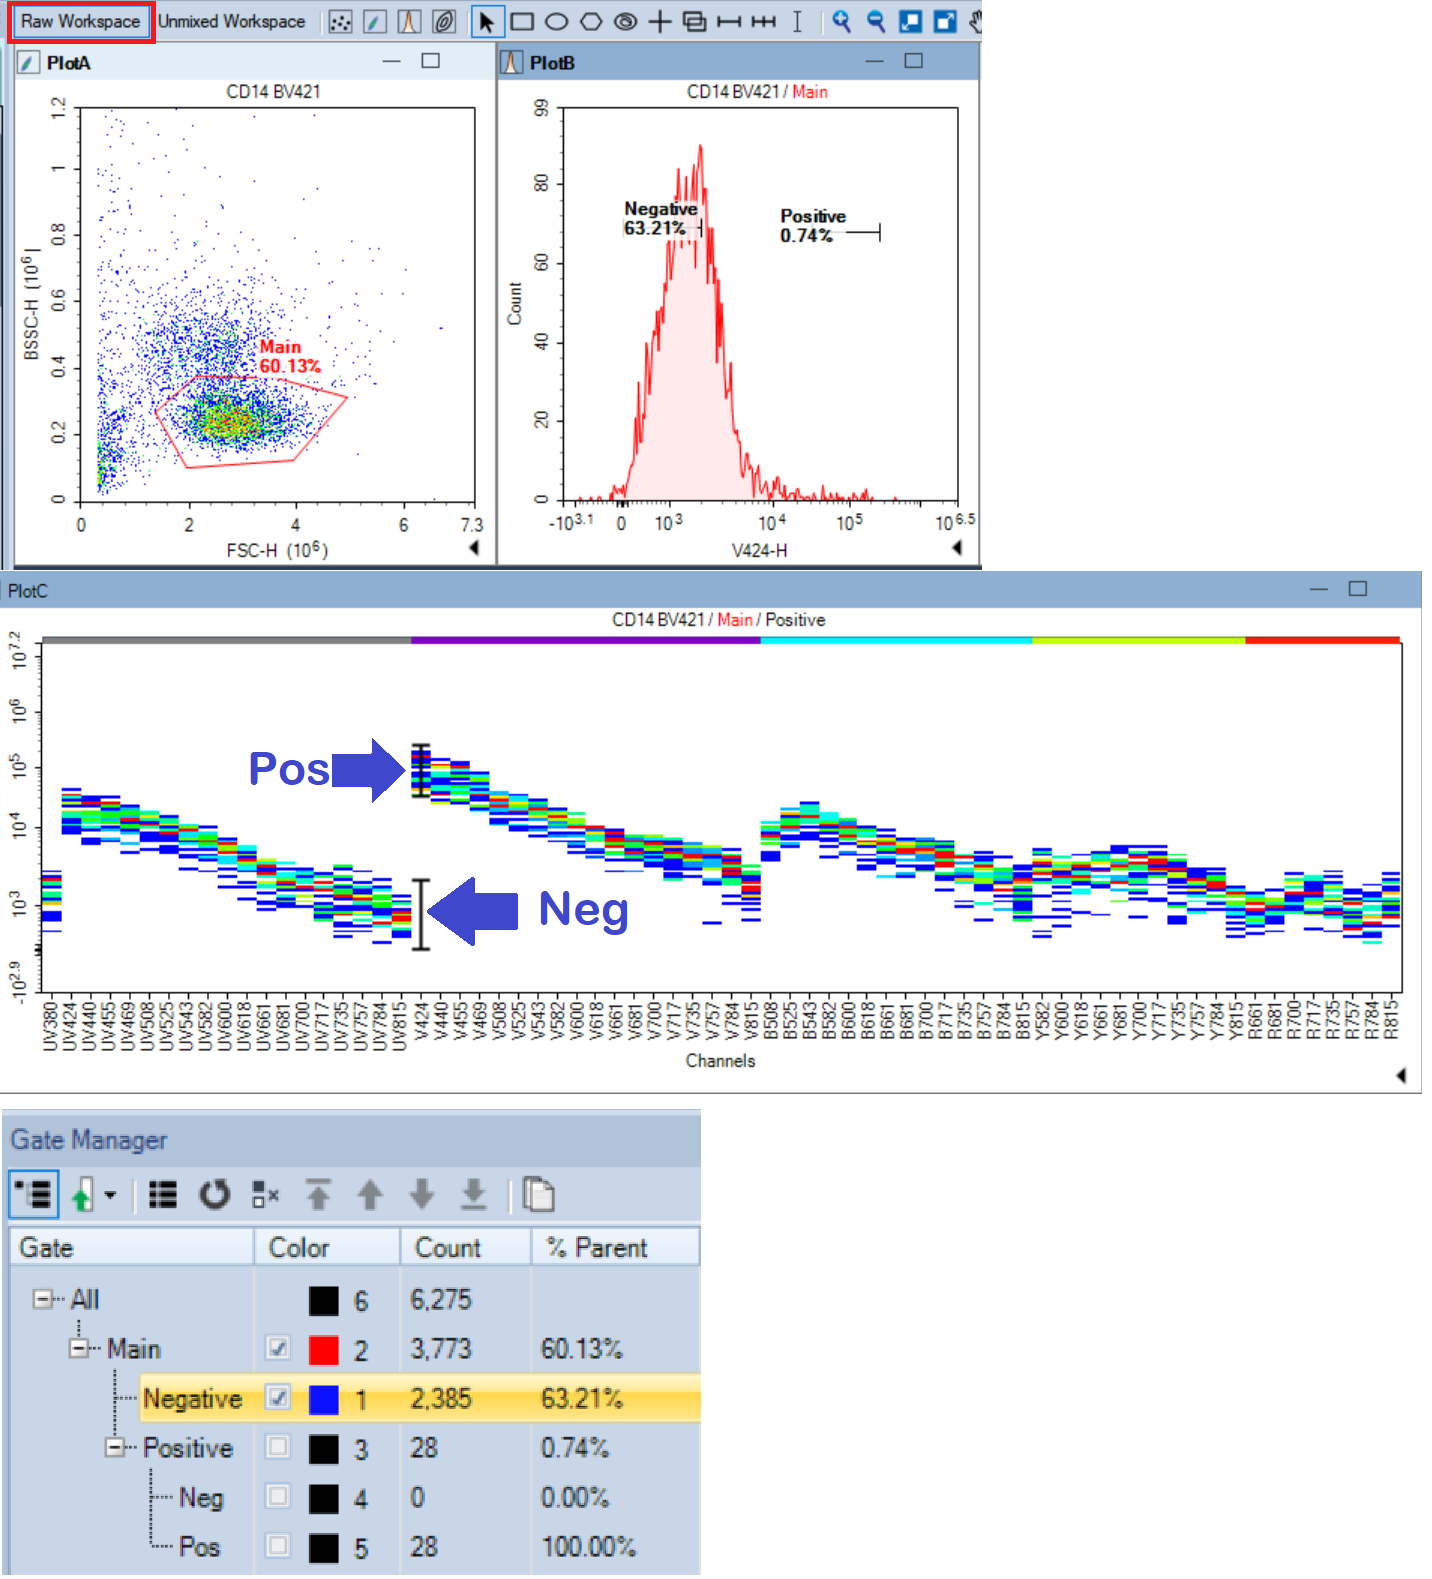
- Activate the Raw Workspace.
- NovoExpress automatically draws gates on Reference controls.
- On Unstained control(s) only one gate, named Main, is generated.
- Five gates are automatically generated on fluorescent controls:
Main, Positive, Negative, Pos, and Neg. - The Positive gate corresponds to Pos gate while the Negative gate corresponds to Neg gate.
- The Negative and Positive gates are set on the Main population.
- The Pos and Neg gates are set on the Positive population
- Attention: Sometimes the Main gate does not have proper shape and cannot be scaled to define the main population of events.
- It is fine to delete the Main gate and redraw it. The newly drawn gate is automatically named Main. Note: It may be necessary to adjust the gating hierarchy!
-
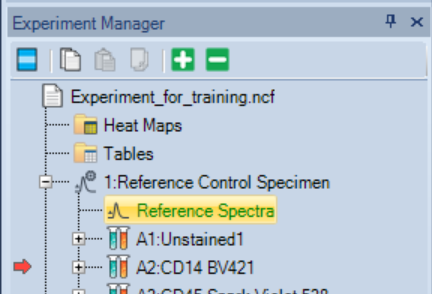
- In Experiment Manager, look for Reference spectra under Reference Control Specimen
- Reference spectra should be shown in green font, signalling that unmixing was calculated.
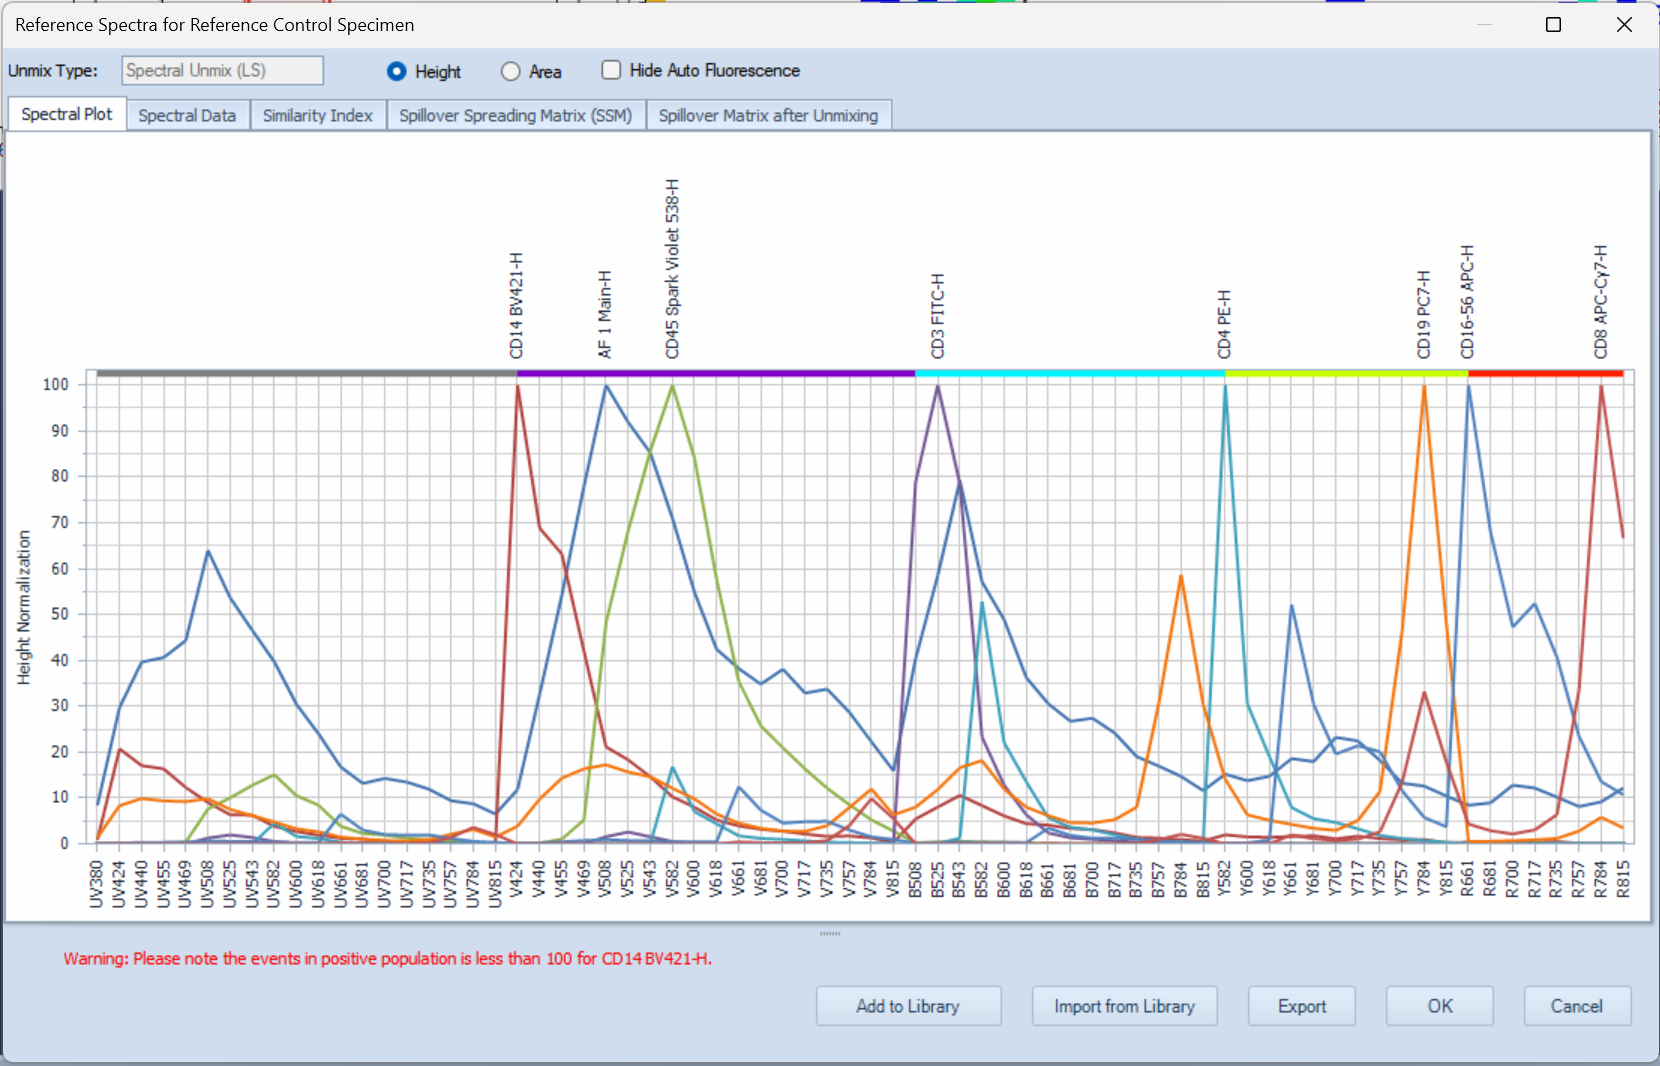
- Double-click Reference Spectra to open the Reference Spectra for Reference Control Specimen window.
-
- Examine the Reference Spectra for Reference Control Specimen window. Check:
- Spectral plot (all fluorochromes added to experiment should be listed!)
- Similarity Index matrix
- Spillover Spreading matrix
- If there are warnings (in red font), you may need to adjust the gates or to troubleshoot the reference controls.
- If unmixing is successful, continue with running samples
5. Run samples
-
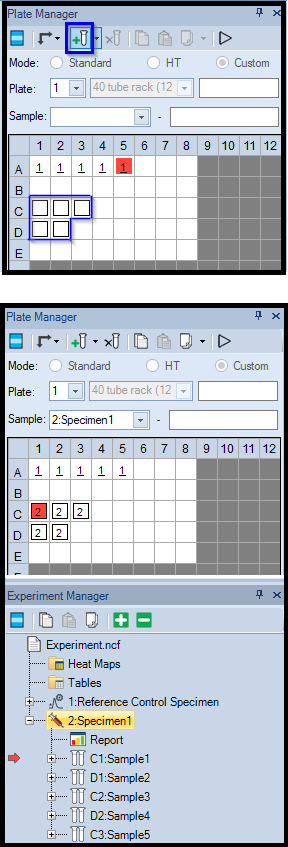
- In Experiment Manager, add specimen(s) and samples.
- In Plate Manager, click-and-drag to select wells
- Click the Tube icon in Plate Manager (framed in green) to add new samples to selected wells.
- The added samples will be immediately visible in Experiment Manager.
- In the example below, a specimen containing 5 samples was added.
- The active sample is marked with a red square in Plate manager and with a red arrow in Experiment Manager.
- Samples can be easily repositioned in Worklist or in Experiment Manager
-
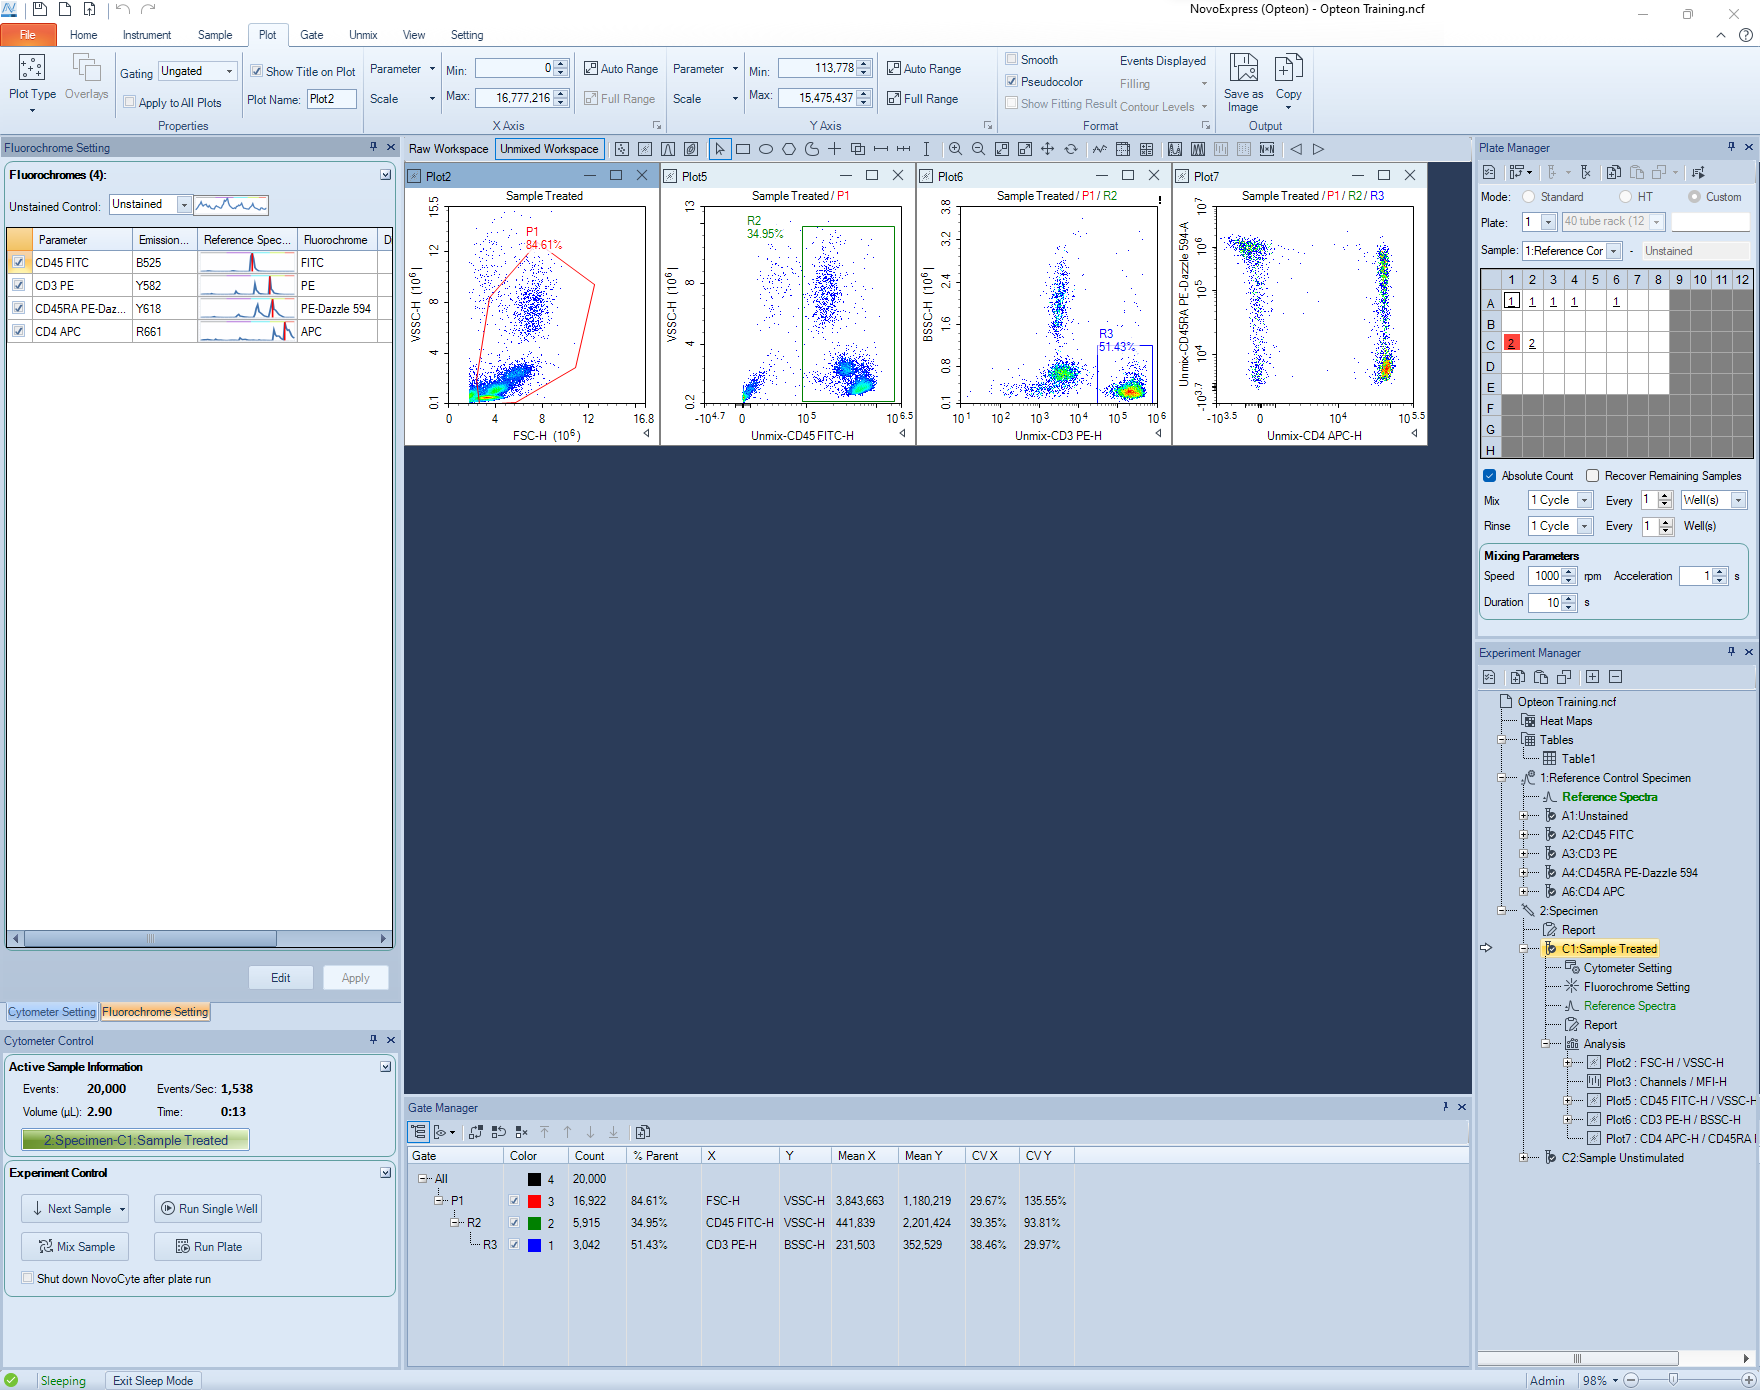
- Click the Unmixed Workspace and add plots and gates.
-
Brief overview:
- Activate the first sample by double-clicking it in Experiment Manager
- In Cytometer Control, click the Run button.
- Go to Cytometer setting and make adjustments to stopping conditions or threshold, if necessary.
- Finish recording the first sample.
- In Experiment Manager, drag-and-drop the first sample onto the Specimen, to apply consistent sample properties.
- Click Run Plate, select wells and confirm.
Note: There are no screenshots added to this section. The steps described here are similar to recording single color controls.
6. Exporting
-
- To export all FCS files, right-click on the Experiment Name and choose Export → Export FCS Files.
- Choose a folder to save the files and click Save.
- It is possible to export only the samples in one specimen (right-click the specimen) or a single sample (right-click the sample).
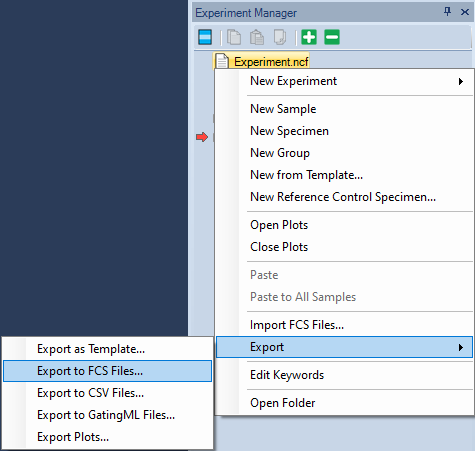
The Export events window will pop-up. Typical selections are shown below.
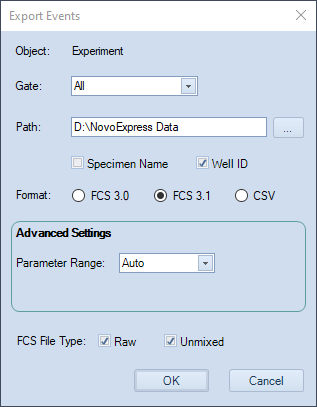
-
- In Experiment Manager, right-click a sample or speciment and select Export → Export Template.
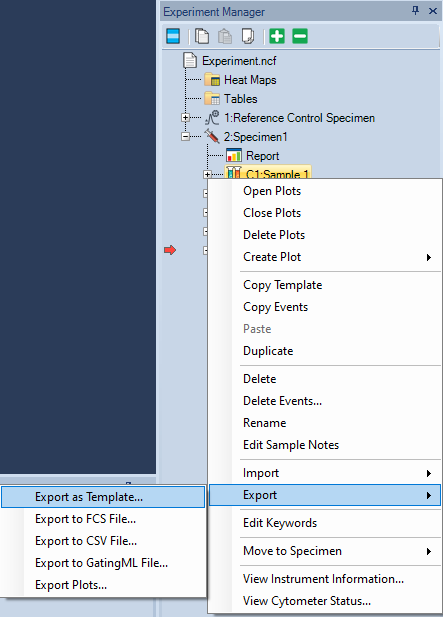
In the Save As window that pops up, choose a folder, name the file, and click Save.
7. Repeating an experiment
-
- Note: Before you begin, export the Template of the relevant sample(s), specimen or whole experiment that needs to be repeated. See 6. Exporting.
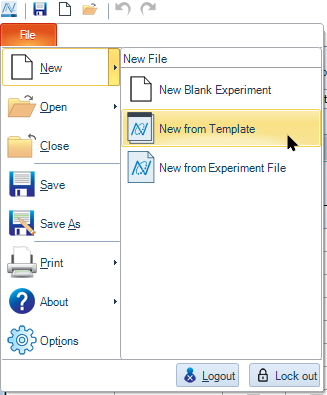
- When the template is available, click File → New → New from Template.
- In the Open window that pops up, navigate to the location where the template was saved, select it and click Open.
-
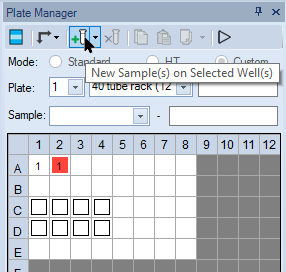
- Select empty wells on the plate and click the New Samples on Selected Well(s) icon.
-
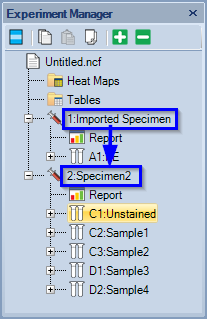
- Drag-and-drop the template settings to the new specimen.
- Rename the new samples if desired.
-
- You may want to run one sample first, to confirm that the the data appears as expected.
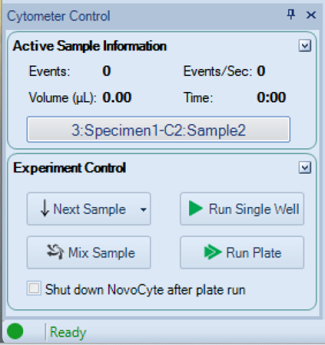
- In Cytometer Control, click Run plate
- In the pop up window (not shown), select the samples to run and confirm.
8. Cleaning and Logout
- Each user must clean the instrument after running samples!
-
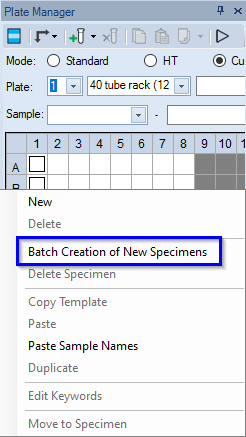
- Select 2 empty wells in the Plate Manager.
- Right-click and select Batch Creation of New Specimens.
- Navigate to the Desktop and select the Cleaning Template file on drive D:\.
- Check Import Specimen Template.
- Click OK
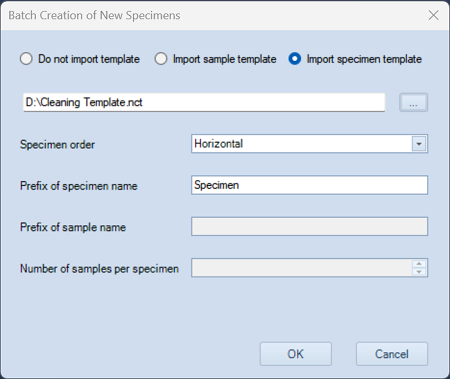
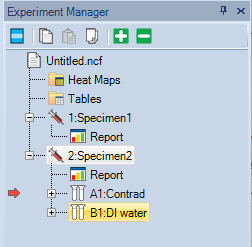
- Two samples will be created: Contrad and DI water.
-
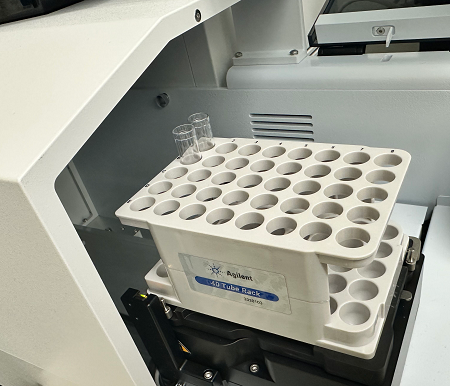
- Place one tube with ~2 ml Contrad and one tube with ~2 ml DI water in the tube rack.
- Make sure the tubes position in the rack matches their position in Experiment Manager.
-
- Click Run Plate in Cytometer Control.
- In the window below, select the two cleaning wells and click Run.
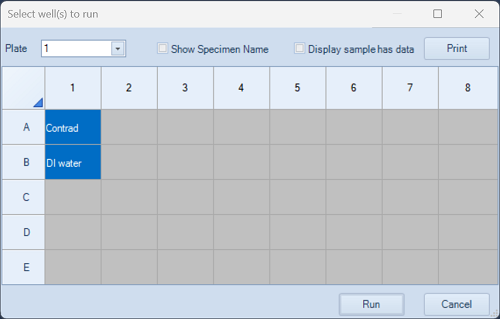
- The cleaning procedure takes about 4 minutes.
-
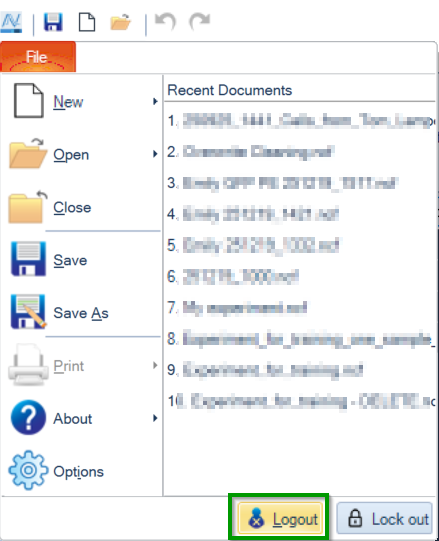
9. Shutdown
-
- If you finish after 5 pm, check the iLab calendar to check if you are the last user of the day.
-
- If you are the last user of the day, press the ON/OFF button on the front panel.
Opteon will perform a self-cleaning cycle and will power off. - Manual shutdown can be initiated in the Instrument tab. Please DO NOT check “Clean sample injection probe” box. The Flow Core staff is responsible for cleaning the sample injection probe.
- If you are the last user of the day, press the ON/OFF button on the front panel.